Wednesday, January 30, 2013

Easy Easter Bunny Party Favor


In the craft world, everything seems to be done a season ahead of schedule!  With that said, I already have Easter ideas brewing in my head.  I'm very excited to share this tutorial because it was  so simple to do and it's a great Easter party favor!

This adorable Easter Bunny is filled with candy.  I can see this as an Easter Day favor, with a bunch of bunnies in a basket for guests to pick up.  This would also be great at the dinner table on each place setting as a gift.

This is so simple and you only need a few things.

1.)  One sheet of felt in the color of your choice.  They usually have pre cut felt at craft and fabric stores in various shades which look to be the same size as a standard white piece of printer paper.
2.)  Ribbon or string
3.)  A sharpie or other marker
4.)  Candy such as jelly beans, gummy bears or something similar that will not melt
5.)  Cellophane plastic wrap


Instructions:
1.)  Start out by wrapping a few candies in cellophane wrap to keep them in a tight bundle.

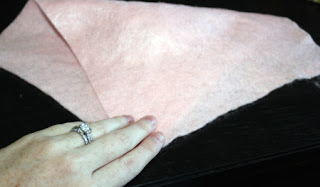
2.)  Place the wrapped candy in the center of the sheet of felt and fold the felt the long way with the top right and bottom left corners meeting.

3.)  Begin to roll the felt tightly from the corner toward the center.


4.)  Roll all the way to the wrapped candy in the center.

5.)  Fold the felt in half, keeping the wrapped candy in the center.

6.)  Slightly kris-cross the ears so the folds of the felt will be visible on the sides of the bunnies head instead of the front and back.

6.)  Tightly secure a ribbon or sting (I used twine) around the center of the felt leaving the two corners to form the ears.  Make small adjustments to tweak the ears as needed.

7.)  Using a sharpie pen, draw the face of the bunny.  You could also glue on buttons if desired.

Happy Easter.... In January!  Hey, it will be here before we know it!
XOXO,
Nicole

Tuesday, January 29, 2013

Travel bag for your shoes- Easy DIY


Whenever I travel, I am always at a loss when it comes to where to put my shoes in my suitcase.  Shoes are not the cleanest things in the world and you don't want to arrive at your destination with your clothes covered in dirt!

This is a simple project and a smart solution to keep your dirty shoes separate from your clean clothes while traveling.  It's super cute too!

I used an old pillow case, cut it in half and made two!  Brownie points for recycling?? :)

Just fold the pillow case in half and either run an iron over the seam or mark the center with a pencil.  Using a rotary cutter or scissors, cut the pillow case in half.
If you choose to make two bags, remember that one side of the pillow case will have two open ends.  Simply turn the pillow case inside out and sew one open end closed.

To create the drawstring, turn the case inside out and fold the top edge over about one inch so the raw edge is to the inside.  You can use an iron to create a crease along the fold just to make it a little easier to keep in place while sewing.

Cut two small holes with a pair of scissors on each side of the side seam for the drawstring.

I chose to use a nylon shoe string, but you could use ribbon as well.  Use your pillow case as a guide for the length, making sure it is just a few inches longer than the circumference of the bag.

Tie a knot on each end of your string and secure a safety pin to one end to help feed the string all the way through.

Make sure you tie the two ends together once you have the string pulled through.

Now comes the fun part- Making the shoe applique!

I actually used a pair of my high heels as a template.  I used a heavy black cotton and used a piece of chalk to trace around the shape of the shoe.
The end result was a little larger than I wanted, but no worries- I just cut out the image slightly on the inside of my traced line.

I chose to do a little detail on the back of my heel applique with some red embroidery thread in a cris-cross pattern with a bow, but you can embellish as you like or just leave as is.


Use a glue stick with just a little glue on the back of the applique and place it on your bag.  This just helps to keep it straight while sewing.  I chose to hand stitch the applique on, but if you're skilled on the sewing machine, you could do that as well.


And there you have it!  So easy and adorable!  
XOXO,
Nicole

Thursday, January 24, 2013

Vintage Dresser Makeover

I recently took in all of my Grandmothers old furniture.  I really wasn't too thrilled about this right at first because well.... It looks OLD!  That's because it is old!  Most of it is mid century and just majorly needed some love.  We have had it stored out in the garage for months and the more I've researched, the more excited I am about this furniture.  First of all, vintage is all the rage right now. Secondly, furniture is crazy expensive!  Most of what you see out there these days isn't even real wood.  I am so glad I decided to put some love and work into these pieces of furniture because the transformation has been amazing!  Check out the before and after.  I will have many more of these to come as I revamp all this furniture.
BEFORE


This dresser is maple.  I have stripped and refinished furniture before and although the result is beautiful, it is absolutely overwhelming work.  I decided to paint this a pretty pale yellow and use it in the master bedroom.

I used a coarse sandpaper and sanded the whole dresser by hand just to get the surface clean and even.  As I mentioned, I did not strip this.  It did take three coats of paint because 1.)  The paint was such a light color and 2.) because I chose not to start with stripped, sanded and prepped wood.

AFTER


I love the result.  This is very shabby chic, vintage, rustic and it has so much character.  I kept the original hardware and spray painted it a dark chocolate brown.  I can't wait to finish the rest of the furniture and share the before and afters with you.

XOXO,

Nicole
 

Template by Suck My Lolly - Background Image by TotallySevere.com