Wednesday, January 23, 2013

DIY Terrariums


I've had these mini terrariums in our home for a while now and I'm impressed at how well they have done.  I love succulents because they look so interesting and are pretty much indestructible!  I clipped these off an existing plant and transferred them to little lanterns with glass doors not knowing how they would take.  They have been going strong for a good six months!  So, I thought this would be a great project to share.


 Here us what you will need:
1.)  A lantern with glass panels similar to the one here which was purchased for cheap from Ikea.  I want to say it was 6 or 7 bucks.

2.)  Succulent plants.

3.)  Silicone sealant to seal the cracks between the panels along the bottom of the lantern so they potting soil won't wash out when you water the plant.

4.)  Potting soil, decorative rocks and moss.

5.)  Screw driver (May or may not need depending on the lantern you use).


Instructions:
Thoroughly wash and dry your lantern.  As I mentioned above, if you use the lantern from Ikea, it does have a candle holder attached to the bottom.  I just used a flat head screwdriver and carefully pried the candle holder off to make more room for my plant.


I then sealed the gaps along the bottom with a clear silicone sealant.  Let this dry overnight before exposing it to soil or water.  I also want to mention to be careful not to seal where the door is.  This seems so obvious, but I mention it because it is something I could totally see myself doing and that would be a real mess!


Next you can move on to potting your succulent.  Place the plant in the center of the lantern and cover the roots with a layer of potting soil.  Place a layer of small stones to help keep the soil in place.  Lastly, add a handful of spanish moss around the plant to help retain moisture.


There it is!  These plants need very minimal watering.  I put them in the kitchen sink and sprinkle a few drops of water on them every other week.  
XOXO- Nicole

Monday, January 21, 2013

Wire Letter Tutorial


 I was originally inspired by something similar I saw on Etsy for a wedding cake topper for my wedding this past April.  I believe it cost around $35.00 plus shipping.  I was a bride on a budget, so I cut costs wherever I could and this is a perfect example of what you can create yourself.  My version cost just a few bucks to make.  You can make these too!
Here is another example that I made for a baby shower decoration.  I thought it was something that could also be hung in the nursery as well later on.

How to create the letters:
I used this website for font inspirations:

http://www.1001freefonts.com/

They have just about every letter type you can think of.  You can use this as a visual guide and try to copy the font as closely as possible, which is what I did.  This may seem intimidating, but this is why we are using flexible wire, you can adjust it over and over.  Just keep playing with it.  You can also print each letter in the size you want and use the printed version as a guide

Supply List:
-Aluminum Craft Wire- 18 Gauge.  You want to wire to be sturdy enough to hold a shape, but also be thin enough to be manipulated into letters.
-If you want to create a look like my wedding cake topper, you will also need a thinner aluminum wire that's more flexible to thread the beading and coil around the 18 gauge letter.  I used 22 gauge for that.  Keep in mind that the higher the gauge, the thinner the wire.  The thinner the wire, the more flexible it is.

For the wedding cake topper, first complete the shape of the letter in the thicker wire.  Then use the thinner wire to string various size beads all around the letter.  I strung one bead for each coil, alternative the different sized beads.


To secure the letter on top of the cake, create a stake on each corner of the letter that will be inserted into the cake.


For the baby shower letters look, you can skip the coiling and beading all together.  Create your letters with the 18 gauge wire and  simply wrap knitting yarn all the way around each letter.


 I secured the yarn at the beginning and end of each letter by simply bending the wire over itself tightly about 1/2 inch as seen in the picture below.  You can adjust the yarn later to cover any snowing wire.


Suspend each letter from the ceiling or the wall with coordinating ribbon.  There are endless possibilities for letter styles and looks.


XOXO,
Nicole

Baby Shower for the Modern Mom


I've been fortunate enough to keep in touch with some great friends from high school. Even after 15 years of being friends, we are all still very much the same. It's amazing to see what paths we have taken so far on this journey of life and even more amazing to see us become Moms! This is why I jumped at the chance to help plan a baby shower for my friend Natalie. It was a perfect excuse to get all of us together to re menace about the good old days and for me to do my favorite thing-- Craft!

With my friend Diana's beautiful home in my high school town of Temecula, CA as a backdrop, we came up with some adorable shower ideas that I would love to share!

When we started brainstorming for shower idea's for Natalie, I had visions of rubber duckies burp cloths and diaper animal center pieces. That is until we found that she painted her baby boy's room, who is named Ethan grey and was not following a nursery theme. We knew minimal was best and started to work on the perfect modern baby shower.

Using grey, Aqua blue and white as the color pallet, we decided to use bow-ties as the theme.


We used my handmade burp cloths, accented with grey fabrics as place mats.  I'll have a link for the tutorial momentarily!


I made these letters "Ethan" letters with flexible wire and grey knitting yarn that had a fun texture. We then used thin aqua ribbon to suspend each letter from the ceiling.


We have Martha Stewart to thank for the how-to on these adorable tissue paper pom poms, which can be found at the following link:

http://www.marthastewart.com/265163/pom-poms-and-luminarias-how-to

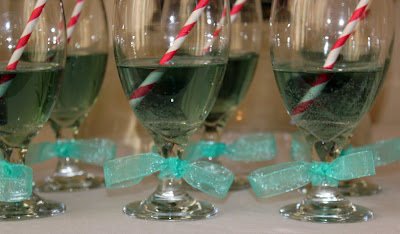
We mixed ginger ale with white cranberry juice and added a few drops of blue food coloring to get these fun mocktails this pretty aqua color. Just a tip- don't add any fresh fruit. We put blueberries in the mix and it turned the drink purple! It also clogged up the spout of the dispinser. Lesson learned!


For a budget friendly favor, I wrapped a king size Snickers bar with grey tissue paper. I literally wrapped it as if it were a present and used scotch tape to secure the folds. I then used black tissue paper to create bow ties. For the bow tie, I cut squares measuring approximately 10" by 10" from a large sheet of some left over tissue paper I had on hand. I folded each square into thirds and made accordion type folds in the tissue paper measuring about every 1/4". I wrapped a strip of black tissue paper around the center of each bow tie and secured with a piece of scotch tape.


We look forward to meeting baby Ethan soon and congratulations to Natalie, Nick and their family!

XOXO,

Nicole
 

Template by Suck My Lolly - Background Image by TotallySevere.com