Wednesday, January 30, 2013

Easy Easter Bunny Party Favor


In the craft world, everything seems to be done a season ahead of schedule!  With that said, I already have Easter ideas brewing in my head.  I'm very excited to share this tutorial because it was  so simple to do and it's a great Easter party favor!

This adorable Easter Bunny is filled with candy.  I can see this as an Easter Day favor, with a bunch of bunnies in a basket for guests to pick up.  This would also be great at the dinner table on each place setting as a gift.

This is so simple and you only need a few things.

1.)  One sheet of felt in the color of your choice.  They usually have pre cut felt at craft and fabric stores in various shades which look to be the same size as a standard white piece of printer paper.
2.)  Ribbon or string
3.)  A sharpie or other marker
4.)  Candy such as jelly beans, gummy bears or something similar that will not melt
5.)  Cellophane plastic wrap


Instructions:
1.)  Start out by wrapping a few candies in cellophane wrap to keep them in a tight bundle.

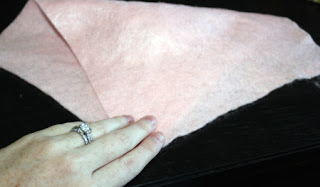
2.)  Place the wrapped candy in the center of the sheet of felt and fold the felt the long way with the top right and bottom left corners meeting.

3.)  Begin to roll the felt tightly from the corner toward the center.


4.)  Roll all the way to the wrapped candy in the center.

5.)  Fold the felt in half, keeping the wrapped candy in the center.

6.)  Slightly kris-cross the ears so the folds of the felt will be visible on the sides of the bunnies head instead of the front and back.

6.)  Tightly secure a ribbon or sting (I used twine) around the center of the felt leaving the two corners to form the ears.  Make small adjustments to tweak the ears as needed.

7.)  Using a sharpie pen, draw the face of the bunny.  You could also glue on buttons if desired.

Happy Easter.... In January!  Hey, it will be here before we know it!
XOXO,
Nicole

Tuesday, January 29, 2013

Travel bag for your shoes- Easy DIY


Whenever I travel, I am always at a loss when it comes to where to put my shoes in my suitcase.  Shoes are not the cleanest things in the world and you don't want to arrive at your destination with your clothes covered in dirt!

This is a simple project and a smart solution to keep your dirty shoes separate from your clean clothes while traveling.  It's super cute too!

I used an old pillow case, cut it in half and made two!  Brownie points for recycling?? :)

Just fold the pillow case in half and either run an iron over the seam or mark the center with a pencil.  Using a rotary cutter or scissors, cut the pillow case in half.
If you choose to make two bags, remember that one side of the pillow case will have two open ends.  Simply turn the pillow case inside out and sew one open end closed.

To create the drawstring, turn the case inside out and fold the top edge over about one inch so the raw edge is to the inside.  You can use an iron to create a crease along the fold just to make it a little easier to keep in place while sewing.

Cut two small holes with a pair of scissors on each side of the side seam for the drawstring.

I chose to use a nylon shoe string, but you could use ribbon as well.  Use your pillow case as a guide for the length, making sure it is just a few inches longer than the circumference of the bag.

Tie a knot on each end of your string and secure a safety pin to one end to help feed the string all the way through.

Make sure you tie the two ends together once you have the string pulled through.

Now comes the fun part- Making the shoe applique!

I actually used a pair of my high heels as a template.  I used a heavy black cotton and used a piece of chalk to trace around the shape of the shoe.
The end result was a little larger than I wanted, but no worries- I just cut out the image slightly on the inside of my traced line.

I chose to do a little detail on the back of my heel applique with some red embroidery thread in a cris-cross pattern with a bow, but you can embellish as you like or just leave as is.


Use a glue stick with just a little glue on the back of the applique and place it on your bag.  This just helps to keep it straight while sewing.  I chose to hand stitch the applique on, but if you're skilled on the sewing machine, you could do that as well.


And there you have it!  So easy and adorable!  
XOXO,
Nicole

Thursday, January 24, 2013

Vintage Dresser Makeover

I recently took in all of my Grandmothers old furniture.  I really wasn't too thrilled about this right at first because well.... It looks OLD!  That's because it is old!  Most of it is mid century and just majorly needed some love.  We have had it stored out in the garage for months and the more I've researched, the more excited I am about this furniture.  First of all, vintage is all the rage right now. Secondly, furniture is crazy expensive!  Most of what you see out there these days isn't even real wood.  I am so glad I decided to put some love and work into these pieces of furniture because the transformation has been amazing!  Check out the before and after.  I will have many more of these to come as I revamp all this furniture.
BEFORE


This dresser is maple.  I have stripped and refinished furniture before and although the result is beautiful, it is absolutely overwhelming work.  I decided to paint this a pretty pale yellow and use it in the master bedroom.

I used a coarse sandpaper and sanded the whole dresser by hand just to get the surface clean and even.  As I mentioned, I did not strip this.  It did take three coats of paint because 1.)  The paint was such a light color and 2.) because I chose not to start with stripped, sanded and prepped wood.

AFTER


I love the result.  This is very shabby chic, vintage, rustic and it has so much character.  I kept the original hardware and spray painted it a dark chocolate brown.  I can't wait to finish the rest of the furniture and share the before and afters with you.

XOXO,

Nicole

Wednesday, January 23, 2013

DIY Terrariums


I've had these mini terrariums in our home for a while now and I'm impressed at how well they have done.  I love succulents because they look so interesting and are pretty much indestructible!  I clipped these off an existing plant and transferred them to little lanterns with glass doors not knowing how they would take.  They have been going strong for a good six months!  So, I thought this would be a great project to share.


 Here us what you will need:
1.)  A lantern with glass panels similar to the one here which was purchased for cheap from Ikea.  I want to say it was 6 or 7 bucks.

2.)  Succulent plants.

3.)  Silicone sealant to seal the cracks between the panels along the bottom of the lantern so they potting soil won't wash out when you water the plant.

4.)  Potting soil, decorative rocks and moss.

5.)  Screw driver (May or may not need depending on the lantern you use).


Instructions:
Thoroughly wash and dry your lantern.  As I mentioned above, if you use the lantern from Ikea, it does have a candle holder attached to the bottom.  I just used a flat head screwdriver and carefully pried the candle holder off to make more room for my plant.


I then sealed the gaps along the bottom with a clear silicone sealant.  Let this dry overnight before exposing it to soil or water.  I also want to mention to be careful not to seal where the door is.  This seems so obvious, but I mention it because it is something I could totally see myself doing and that would be a real mess!


Next you can move on to potting your succulent.  Place the plant in the center of the lantern and cover the roots with a layer of potting soil.  Place a layer of small stones to help keep the soil in place.  Lastly, add a handful of spanish moss around the plant to help retain moisture.


There it is!  These plants need very minimal watering.  I put them in the kitchen sink and sprinkle a few drops of water on them every other week.  
XOXO- Nicole

Monday, January 21, 2013

Wire Letter Tutorial


 I was originally inspired by something similar I saw on Etsy for a wedding cake topper for my wedding this past April.  I believe it cost around $35.00 plus shipping.  I was a bride on a budget, so I cut costs wherever I could and this is a perfect example of what you can create yourself.  My version cost just a few bucks to make.  You can make these too!
Here is another example that I made for a baby shower decoration.  I thought it was something that could also be hung in the nursery as well later on.

How to create the letters:
I used this website for font inspirations:

http://www.1001freefonts.com/

They have just about every letter type you can think of.  You can use this as a visual guide and try to copy the font as closely as possible, which is what I did.  This may seem intimidating, but this is why we are using flexible wire, you can adjust it over and over.  Just keep playing with it.  You can also print each letter in the size you want and use the printed version as a guide

Supply List:
-Aluminum Craft Wire- 18 Gauge.  You want to wire to be sturdy enough to hold a shape, but also be thin enough to be manipulated into letters.
-If you want to create a look like my wedding cake topper, you will also need a thinner aluminum wire that's more flexible to thread the beading and coil around the 18 gauge letter.  I used 22 gauge for that.  Keep in mind that the higher the gauge, the thinner the wire.  The thinner the wire, the more flexible it is.

For the wedding cake topper, first complete the shape of the letter in the thicker wire.  Then use the thinner wire to string various size beads all around the letter.  I strung one bead for each coil, alternative the different sized beads.


To secure the letter on top of the cake, create a stake on each corner of the letter that will be inserted into the cake.


For the baby shower letters look, you can skip the coiling and beading all together.  Create your letters with the 18 gauge wire and  simply wrap knitting yarn all the way around each letter.


 I secured the yarn at the beginning and end of each letter by simply bending the wire over itself tightly about 1/2 inch as seen in the picture below.  You can adjust the yarn later to cover any snowing wire.


Suspend each letter from the ceiling or the wall with coordinating ribbon.  There are endless possibilities for letter styles and looks.


XOXO,
Nicole

Baby Shower for the Modern Mom


I've been fortunate enough to keep in touch with some great friends from high school. Even after 15 years of being friends, we are all still very much the same. It's amazing to see what paths we have taken so far on this journey of life and even more amazing to see us become Moms! This is why I jumped at the chance to help plan a baby shower for my friend Natalie. It was a perfect excuse to get all of us together to re menace about the good old days and for me to do my favorite thing-- Craft!

With my friend Diana's beautiful home in my high school town of Temecula, CA as a backdrop, we came up with some adorable shower ideas that I would love to share!

When we started brainstorming for shower idea's for Natalie, I had visions of rubber duckies burp cloths and diaper animal center pieces. That is until we found that she painted her baby boy's room, who is named Ethan grey and was not following a nursery theme. We knew minimal was best and started to work on the perfect modern baby shower.

Using grey, Aqua blue and white as the color pallet, we decided to use bow-ties as the theme.


We used my handmade burp cloths, accented with grey fabrics as place mats.  I'll have a link for the tutorial momentarily!


I made these letters "Ethan" letters with flexible wire and grey knitting yarn that had a fun texture. We then used thin aqua ribbon to suspend each letter from the ceiling.


We have Martha Stewart to thank for the how-to on these adorable tissue paper pom poms, which can be found at the following link:

http://www.marthastewart.com/265163/pom-poms-and-luminarias-how-to

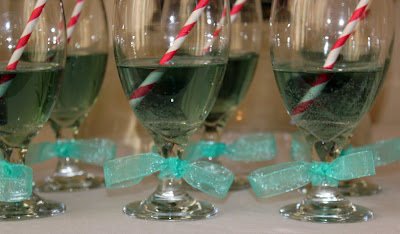
We mixed ginger ale with white cranberry juice and added a few drops of blue food coloring to get these fun mocktails this pretty aqua color. Just a tip- don't add any fresh fruit. We put blueberries in the mix and it turned the drink purple! It also clogged up the spout of the dispinser. Lesson learned!


For a budget friendly favor, I wrapped a king size Snickers bar with grey tissue paper. I literally wrapped it as if it were a present and used scotch tape to secure the folds. I then used black tissue paper to create bow ties. For the bow tie, I cut squares measuring approximately 10" by 10" from a large sheet of some left over tissue paper I had on hand. I folded each square into thirds and made accordion type folds in the tissue paper measuring about every 1/4". I wrapped a strip of black tissue paper around the center of each bow tie and secured with a piece of scotch tape.


We look forward to meeting baby Ethan soon and congratulations to Natalie, Nick and their family!

XOXO,

Nicole

Monday, January 14, 2013

Valentines Day Heart Wreath

The day of love will be here before we know it! Wait, let me edit that- Everyday is a day of love, but the day that celebrates love is nearly upon us! Of course i'm talking about Valentine's Day! Accordingly, I want to share a easy and inexpensive heart wreath tutorial.


I just LOVE this! :) HAHA

Start out with a wire hanger and bend it into the shape of a heart.


You'll need about 1/4 yard of fabric total. I used strips of red, pink and off white. I found it easier to fold my fabric and cut long strips. I then folded each strip and cut them down to 3 inches.

Tie the fabric strips with a simple knot all the way around the heart. SO SIMPLE!


Wednesday, January 9, 2013

Valentines Day Gloves


Embellish a pair of gloves with felt hearts for valentines day! This took 5 minutes to do. I chose to cut a heart in half and hand stitched each side of the heart to the center of each glove on the palm side so the heart would be formed when I cupped my hands together. You could also sew one small heart on each fingertip. I also thought about stitching one heart on the top of each glove and stitching "BE" on one glove and "MINE" on the other.

Tuesday, January 8, 2013

Coffee Mug Cozie Tutorial

Winter has arrived and it's chilly outside! This nippy weather puts me in the mood for hot chocolate, teas and coffee! Hence the inspiration for my new project-- Coffee mug cozies. I've seen some really cute knitted ones on etsy, but if you're like me and haven't mastered knitting just yet (Maybe another New Year's resolution?) there is another more quick and easy way to create one. This would make a really great Valentine's gift for a friend. You could tie this around a pretty coffee mug and put a few envelopes of hot chocolate inside.


INSTRUCTIONS:
You could really use any thick fabric of your choice for this. I had some beautiful leftover knit fabric from my sweater recycle (I used the majority of it for my arm warmers) but the pretty red, woven fabric is perfect for a cozie. I then used a contrasting black heavy cotton for the inside of the cozie. Use your favorite coffee cup as a guide, but this one is 8" long and 3" wide. I used a thick braided sting on both corners of each end measuring about 8" long each to enable plenty of slack for tying.


I used my sewing machine, but you could also hand sew this if you aren't familiar with the machine.

Using fabric pins, secure each sting in place. Place right sides of both fabrics together and stitch three of the four sides together. Turn fabric right side out and fold the edges of the open end under,and use a zig-zag stitch to close the opening.


Template by Suck My Lolly - Background Image by TotallySevere.com